Saturday, November 28, 2015

27 NOV 15: Section 37, fuel system, page 39-3 steps 2-5: 5 hours
Flew up to Atlanta to spend Thanksgiving with my Dad and his wife.  Upon returning, I had my new tubing bender – works much better than the cheapo I purchased from Cleaveland:
Reworked the hard line from the filter to the pump:
Finished up by completing the F-1089 elevator pushrod:

28 NOV 15: Section 37, fuel system, page 39-4 steps 2-5: 6.5 hours
Reworked the hard line from the pump to the transducer:
Went through and torqued all the fittings using a crow’s foot.  Surprisingly, I was able to reach them all with the torque wrench.  Finished the session by making the F-1090 elevator pushrod.  Riveting the VA-101 threaded rod end:
Both pushrods complete:

Tuesday, November 24, 2015

24 NOV 15: Section 37, fuel system: 4.5 hours
Riveted angle to center tunnel:
Fuel pump fit into angles:
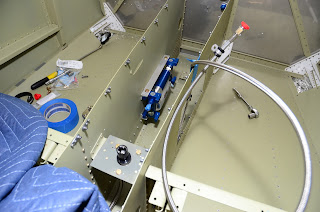
Everything fit into place.  When I remake the line from the filter to the pump, I’ll have to angle it further away from the pump cover plate as it comes quite close to the upper right mounting bolt.  I also have to adjust the angle of the line from the pump to the transducer.  Originally when I made the line, the fitting on the input side of transducer was at 3:00.  Now that it is fully installed, it ended up at 12:00 – very short line, will be tough to make those angles work, but I’ll figure something out:

Monday, November 23, 2015

16 NOV 15: Page 33-10 steps 10-12, page 35-5 step 4, page 35-9 step 3: 3 hours
Riveted the wear blocks to the baggage bulkhead corrugations, riveted the splice plate to the aft tunnel cover assembly, riveted the nutplates to the F-1015D-L/R mid cabin side covers:

17-19 NOV 15: Tunnel insulation, brake line/fuel line/pump part fabrication: 8 hours
Installed the center tunnel insulation and prepped brake/fuel line parts and fabricated brackets to mount the fuel pump/filter – no pics.

21 NOV 15: Fuel line/system fabrication: 3 hours
Spent quite a long time figuring out how to install all the center tunnel fuel system components.  Close to the final, but not quite the final configuration:

22 NOV 15: Fuel lines: 8 hours
A very long day of messing with the fuel system.  Began by fabricating mounting brackets out of angle to mount the pump on the left side of the tunnel:
I then attached the filter to the kickplate on the side of the pump:
This location will make most of the components very accessible by the access panel:
Finished the session by fabricating hard lines for the filter and transducer:
My tubing bender was not large enough, so I made this temp lines bending them around a 1.25” piece of PVC.  When the larger tubing bender arrives, I will fab the final lines.

23 NOV 15: Disassembled fuel system, prime, page 36-3 steps 2-6, page 36-4 1-2: 7.5 hours
Primed the fuel pump mounting parts and a few remaining pieces:

Removed all the fuel system components and final installed the center tunnel insulation and brake lines:
Brake lines from tunnel to gear mount:

Monday, November 16, 2015

8 NOV 15: Page 35-3 1(left), redo page 34-4 5-9, page 34-5 5-7, page 34-6 1-3: 8.5 hours
Finished riveting right passenger seat floor in place.  Redid the baggage door frame.  Lock assembly installed:
Match-drilled the holes of the F-1058 hinge frame into the F-1060 hinge.  Spacing looks pretty good:
I wanted to get the hinge as flush as possible to the fuselage skin.  Looks pretty good:

9 NOV 15: Page 34-6 steps 5-7, 35-2 5 (left), 35-3 1-2, 35-4 2: 10.5 hours
Attached baggage door assembly and striker plate.  Riveted left passenger floor and seat pan in place – no pics.

12 NOV 15: Page 33-10 steps 1-3: 3 hours
Match drilled, dimpled, and installed nutplates to the F-1006A/B/C bulkheads – no pics.

13 NOV 15 Page 33-10 steps 5-9, paint prep: 3 hours
Match-drilled #30 the holes of the F-6114B/C wear blocks into the F-1006F/E baggage bulkheads:
Prepped parts for paint.  These are interior pieces that have already been primed.  I scuffed the primer coat in preparation to paint them with the interior urethane paint:

14 NOV 15: Installed parking brake mount, paint: 4.75 hours
I initially decided not to install the Matco parking break because I had heard about problems with the module leaking.  I heard they changed the module, so I decided to bite the bullet and install it.  Even though there have been very few times over the past several hundred hours in my 7A that I had the need for a parking brake, when you need one and don’t have one, well…  Mount installed to the firewall:
Interior covers painted with the medium-stone urethane to match the interior color.  This is about it for priming/painting of airframe parts:

15 NOV 15: Wiring, page 34-7 steps 4-5, page 35-3 step 4: 5.25 hours
My friend Mike (Gulfstream A&P/-14 builder) came over and gave me a crash course in wiring techniques.  May seem dumb for such a simple task, but from someone who has NO experience doing any electrical wiring outside of some shoddy crimp/soldering work around the garage, it was a huge sense of accomplishment splicing these light wires and soldering the switch connections for the baggage lights.  Aft end:
Finished product installed:
Finished the evening by installing the F-1081 left baggage cover:

Saturday, November 7, 2015

4 NOV 15: Page 39-3 step 1, 39-4 step 2, redo baggage frame:  3 hours
Cut the elevator forward and mid pushrods.  Drilled holes for baggage compartment lights.  I’m installing two LED lights and a small switch:
Redid the baggage frame.  Redrilled and ready to prime:


6 NOV 15: Page 35-2 steps 3-5, Prekote, Prime: 9 hours
Dimpled passenger floor pans.  MANY thanks to friend and fellow RV-10 builder, Mike Jimenez, who recommended only installing the pesky floor pans once – not in and out, due to them being very difficult to insert/remove.  I also enlarged the forward openings slightly based on his recommendation.  Used a couple pieces of scrap .020 to cover the belt anchors – made the installation a snap:
Spent the rest of the work session priming my final pieces remaining.  The only metal remaining are the wing fairings.  Everything else is primed and ready to go!

7 NOV 15: Page 11-8 step 8, 11-9 steps 1-5, page 35-2 step 5 (right), 35-3 1(right): 7.25 hours
Riveted together the trim mount bracket assembly.  Installed the elevator trim cables:
Finished riveting the right passenger floor pan in place.  Pretty awesome to be sitting inside the plane!
Riveting the aft flange of the floor pan:
Riveted the F-1024-R seat pan into place.  Right side pax seat and floor all installed:
Ordered some rubber grommets from aircraft spruce.  They were a perfect fit for the bulkhead holes and the inner diameter was the perfect size for the conduit: